Deploy PHP/Laravel applications using Gitlab CI/CD
We make sure our PHP/laravel applications are always in shape. Here is how to setup your servers and gitlab to get an awesome multi-environment deployment.
Intro
I am a big fan of process optimization, and I love trying out new ways to develop, deploy, and work on big software projects.
As head of a software development agency in Vienna, Austria, I was lucky enough to have worked on over 100 big web and mobile applications over the last 15 years with startups, international companies, and other amazing developers to try, fail and refine these processes over and over again.
The following approach is meant to share the learnings and our current solution with you.
To get this out of the way: If you have feedback, suggestions on that, please share them with us in the comments! I would love to hear your thoughts and the approach that works well for you.
We use GitLab for continuous integration/deployment, but this should also work with other tools like Jenkins, ….
Requirements:
To go along with this post, you have to have the following things already setup:
- A gitlab instance or an account on gitlab.com
- A gitlab ci runner (click to go to gitlab docs, about setting it up)
- 3 webspace on a server
- A PHP/laravel project ready to be deployed
Preparation
To prepare our PHP project for our deployment workflow, we have to prepare 3 Servers/Webspaces:
(we will refer to these as “environments” from now on)
Environments:
- Development (only internally to test and review)
- Staging (for the client to test and review)
- Production (final system for end-users)
They will correlate with our branches:
- development (= development environment)
- master (= staging environment)
- production (= production environment)
To find out why exactly 3 environments and how this works, check out my other blog entry on that topic:
https://simonauer.medium.com/how-to-set-up-your-staging-environment-for-web-applications-480e0138e620
Domain Conventions for environments:
To make sure this process and domains are easy to remember for everyone in the team, we always use the same domain patterns.
For this reason, we have registered 2 domains for our internal use as staging and development domain:
(the ones used here are just examples)
- *.stagingdomain.at (for example — for staging)
- *.devdomain.at (for example — development)
Examples:
- Development: {PROJECT_PRODUCTION_DOMAIN_WITH_DASH}.devdomain.at
( example: my-domain-com.devdomain.at) - Staging: {PROJECT_PRODUCTION_DOMAIN_WITH_DASH}.stagingdomain.at
( example: my-domain-com.stagingdomain.at ) - Production: {PROJECT_PRODUCTION_DOMAIN}
( example: my-domain.com )
So every domain that ends in “devdomain.at” is a development domain.
And every domain that ends in “stagingdomain.at” is a staging domain.
Now let’s get started with setting up your servers and gitlab to deploy your PHP projects.
Make sure that you have SSH access to the environment servers and you have the credentials.
Prepare server login
SSH Key for login exists
If you have a server with login via ssh key enabled, we should be fine, and you can use the public part of the key in the next steps in the GitLab-ci variables.
SSH Key doesn’t exist
If we either don’t have an ssh key for login or have a server accessible via password, we would like to do the deployment using an ssh key.
So let’s generate one: (you have to do this for all of the servers above if they are on different access accounts)
Create a new ssh key for every environment: (unless they are accessible with the same account anyway)
Run the following command on your local bash:
ssh-keygen -t rsa -b 4096 -C "deploy@{PROJECT_AND_ENVIRONMENT_URL}"You will now be asked:
Enter file in which to save the key (/home/user/.ssh/id_rsa):
We will use “.{/PROJECT}_deploy" for now.
(replace {PROJECT} with your project name, of course)
(this will save two files in your current directory “{PROJECT}_deploy” (private key part — saved on the server in next step) and “{PROJECT}_deploy.pub” (public part — used as GitLab CI variable)
I would recommend using a name that lets you easily find and delete it afterward.
(NEVER accept the default name because it will overwrite your current ssh key, which you might use in GitLab, …)
It will then ask you for a password. ALWAYS leave this field blank!!
Now upload ssh key to server:
Now that we have generated an ssh key, we are ready to tell our server to accept this SSH Key in the future.
We do this by rerunning the following command in your local bash:
ssh-copy-id -i ./{PROJECT}_deploy {SERVER_SSH_USER}@{SERVER_SSH_HOST} -p{PORT}Now your ssh key should have been copied to the server, and you can access the server by calling the following URL and not having to enter a password at all.
(to test this, you have to copy the two files into your ~/.ssh directory)
ssh {SERVER_SSH_USER}@{SERVER_SSH_HOST} -p{PORT}Prepare folder structure
As a convention, we always save laravel API projects into an api subfolder on the server.
This folder then contains the 2 test environments (development, staging) on the dev server (to save server instances), and we will put the project api folder directly on the production server. (for security reasons, this will be its own folder.)
So here is the folder structure for our projects:
Testing Server:
// our php project folders
- api
--- development
------- current (contains the project)
------- shared
--- staging
------- current (contains the project)
------- shared
// other project folders (frontend, ...)
- frontend
- additional_clients
Production Server:
// our php project folders
- api
--- current (contains the project)
--- shared
// other project folders (frontend, ...)
- frontend
- additional_clients
Sidenote:
As you can see, we put the environments into a folder calledapi.The reason for that is, that we also sometimes host other clients (static react /vue applications) on the same server. If you only have the PHP application, there is no need for that and you can just put thecurentandsharedfolders in the root dir.
Deployment of laravel
To deploy our laravel applications, we use the package:
https://github.com/lorisleiva/laravel-deployer
It will take care of zero-downtime deployments and handle all the details for us.
We can use the following blueprint for our
Add gitlab-ci file to your projects.
Now all that is left is to create a gitlab-ci file and configure it.
Let’s get started with the ci file.
Create the following file in the root of your git project and call it gitlab-ci.yml :
image: lorisleiva/laravel-docker:7.4 # the number here resembles the php version, so you might have to adjust it to 8.0, ...## templates.init_ssh: &init_ssh |
  mkdir -p ~/.ssh
  chmod 700 ~/.ssh
  [[ -f /.dockerenv ]] && echo -e "Host *\n\tStrictHostKeyChecking no\n\n" > ~/.ssh/config
.change_file_permissions: &change_file_permissions |
  find . -type f -not -path "./vendor/*" -exec chmod 664 {} \;
  find . -type d -not -path "./vendor/*" -exec chmod 775 {} \;

### the stages we go throughstages:
  - build
  - test
  - deploy## preparecomposer:
  stage: build
  cache:
    key: ${CI_COMMIT_REF_SLUG}-composer
    paths:
      - vendor/
  script:
    - *init_ssh
    - composer install --prefer-dist --no-ansi --no-interaction --no-progress --no-scripts
  only:
    - master
    - production
    - development## DEPLOYMENT
deploy_development:
  stage: deploy
  script:
    - eval $(ssh-agent -s) && echo "$SSH_PRIVATE_KEY" | tr -d '\r' | ssh-add - > /dev/null
    - *init_ssh
    - *change_file_permissions
    - php artisan deploy {MY_DOMAIN}.devserver.at -s upload
  environment:
    name: development
    url: https://{MY_DOMAIN}.devserver.at
  only:
    - developmentdeploy_staging:
  stage: deploy
  script:
    - eval $(ssh-agent -s) && echo "$SSH_PRIVATE_KEY" | tr -d '\r' | ssh-add - > /dev/null
    - *init_ssh
    - *change_file_permissions
    - php artisan deploy {MY_DOMAIN}.stagingserver.at -s upload
  environment:
    name: staging
    url: https://{MY_DOMAIN}.stagingserver.at
  only:
    - masterdeploy_production:
  stage: deploy
  script:
    - eval $(ssh-agent -s) && echo "$SSH_PRIVATE_KEY" | tr -d '\r' | ssh-add - > /dev/null
    - *init_ssh
    - *change_file_permissions
    - php artisan deploy {MY_DOMAIN} -s upload
  environment:
    name: production
    url: https://{MY_DOMAIN}
  only:
    - production
Add credentials to CI/CD Deployment variables.
Already everything is set up, and we are ready to set our credentials in GitLab ci.
To do this, open your GitLab interface and go to your repository.
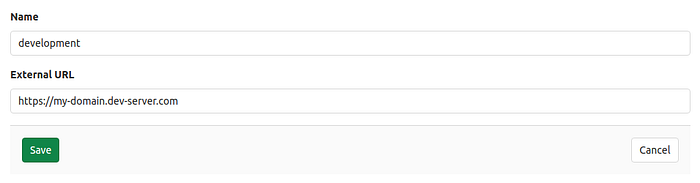
Create different environments in GitLab Operations:
Environments let us monitor each of our environments' deployment status and define the same CI/CD Variable name with different values for different environments.
You can find your environments in your repository in the left menu under:
Operations -> Environments
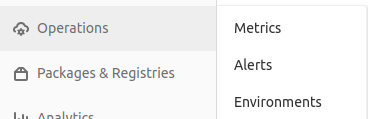
No, go ahead and add new environments for each of the environments:
(You can find the New environment button on the top right on the environments overview)
- development
- master
- production
Just enter the environment name and the dedicated URL, which can be used to test it later.
(this will add a button to access the correct environment in the browser easily)
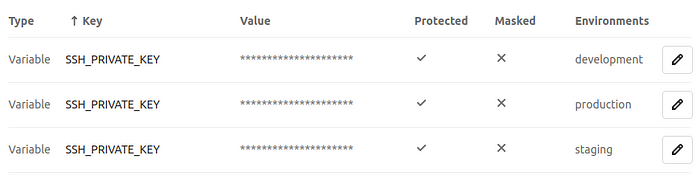
Now add the following variables:
On the left menu, you need to go to Settings -> CI/CD -> Variables .
Now add a protected variable SSH_PRIVATE_KEY for all of the environments and select the correct environment scope from the list.
tipp:
if you click on the “environment scope” dropdown, it will only show you the selected value by default. You have the little “x” to clear the selection and then you see all your created environments in the list — no idea, why they did it like that, but it is confusing if you don’t know.
As a value, use the content of the private key file:
cat ./{PROJECT}_deployIt should look like this:
Run Pipeline and enjoy
Now everything should be ready, and you can try out your awesome new deployment process.
Just merge some changes into the branch you want to deploy:
- development
- staging
- production
Gitlab Pipeline with PHPunti and code style checking
Well, that’s it. Everything should work fine now and be ready for perfect zero-downtime deployments and an awesome workflow, but I got more for you ;)
Let’s take it to the next level and add automated quality assurance into the pipeline like code style check and PHPUnit.
A working gitlab Laravel pipeline with PHPUnit, code style, and more

Thank you very much for taking the time to read this.
If you went this far down, I would really appreciate your comment and input.
How are you guys doing it?
I will post more about DevOps, deployment, coding (especially react, flutter and laravel) in the future, so follow me to read more ;)